Freenas Firmware Update Stuck at 1/3 Uploading Firmware
2. Installing and Upgrading FreeNAS®
Before installing, it is of import to remember that the FreeNAS® operating system must be installed on a separate device from the drive(south) that volition concur the storage data. In other words, if yous but have one disk drive y'all will be able to utilise the FreeNAS® graphical interface merely won't be able to store any data, which after all, is the whole signal of a NAS system. If yous are a home user who is experimenting with FreeNAS®, you can install FreeNAS® on an cheap USB thumb drive and apply the figurer's disk(south) for storage.
This section describes the following:
- Getting FreeNAS®
- Preparing the Media
- Performing the Installation
- Installation Troubleshooting
- Upgrading
- Virtualization
2.1. Getting FreeNAS®
The latest STABLE version of FreeNAS® 9.three can exist downloaded from http://download.freenas.org/.
Note
FreeNAS® will but install to 64-bit hardware and the installer will not work on 32-bit hardware.
The download folio contains the following types of files:
- .iso: this is a bootable installer that tin can exist written to either a CD or USB flash equally described in Preparing the Media.
- .GUI_Upgrade.txz: this is a compressed firmware upgrade image. If your intent is to upgrade FreeNAS®, download this file and run across the department on Upgrading.
Each file has an associated sha256.txt file which should be used to verify the integrity of the downloaded file. The command you use to verify the checksum varies by operating system:
- on a BSD system use the command sha256 name_of_file
- on a Linux system utilise the command sha256sum name_of_file
- on a Mac organisation use the command shasum -a 256 name_of_file
- on a Windows or Mac system, you tin likewise install a utility such as HashCalc or HashTab
The value produced past running the command should match the value of the sha256.txt file.
2.3. Performing the Installation
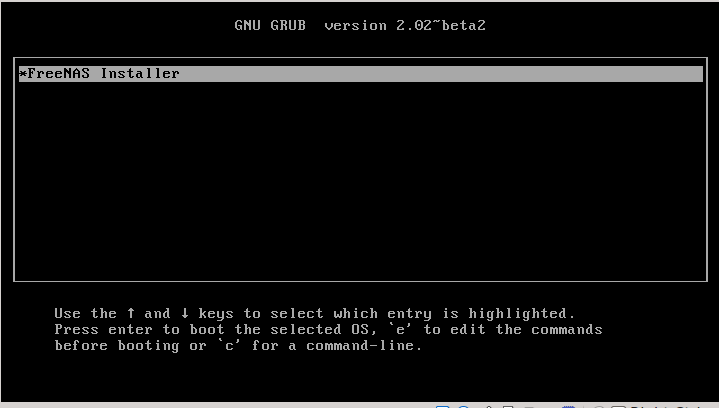
With the installation media inserted, boot the system. This should load the FreeNAS® installation's Grub menu shown in Effigy ii.3a.
Figure 2.3a: FreeNAS® Grub Menu
Note
if the installer does non boot, check that the installation device is listed first in the boot order in the BIOS. When booting from a CD, some motherboards may require you lot to connect the CD device to SATA0 (the first connector) in order to kicking from CD. If the installer stalls during bootup, double-check the SHA256 hash of the .iso file. If the hash does not match, re-download the file. If the hash is correct, try called-for the CD again at a lower speed or try writing the file to a different USB stick.
Either wait for the menu to timeout or press Enter to kicking into the installer. Once the media has finished booting, you will be presented with the panel setup menu seen in Figure 2.3b.
Figure 2.3b: FreeNAS® Console Setup
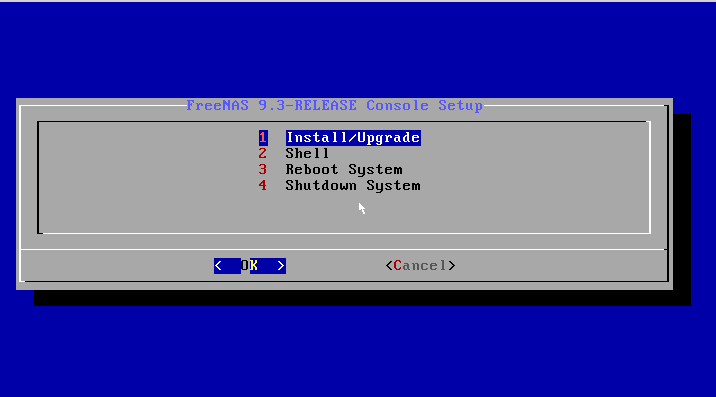
Press Enter to select the default choice of "one Install/Upgrade". The side by side menu, seen in Figure 2.3c, will list all bachelor drives, including any inserted USB thumb drives which will begin with da. In this example, the user is performing a exam installation using VirtualBox and has created a 8 GB virtual disk to hold the operating system.
Figure 2.3c: Selecting Which Drive to Install Into
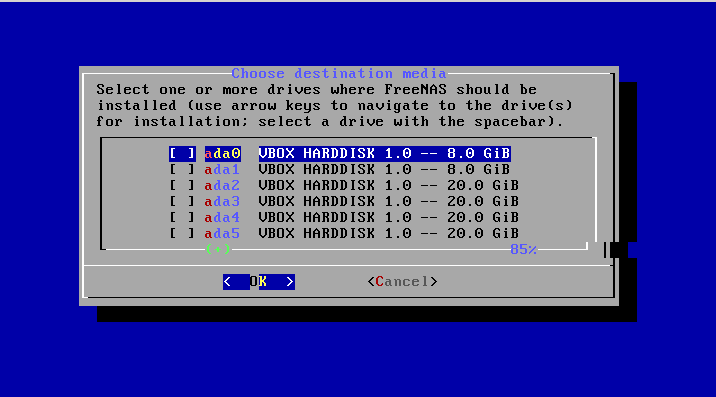
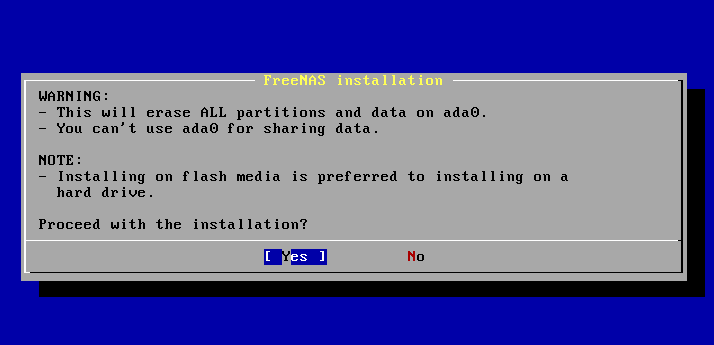
Utilize your pointer keys to highlight the USB, compact flash device, or virtual disk to install into and press the spacebar to select it. If you wish to mirror the kicking device, arrow to the second device and printing spacebar to select it likewise. Later making your selections, press Enter . FreeNAS® will issue the alarm seen in Figure 2.3d, reminding you to not install the operating system onto a drive that is meant for storage. Press Enter to advance to the screen shown in Effigy 2.3f.
Figure ii.3d: FreeNAS® Installation Alert
Annotation
at this time, the installer does not bank check the size of the install media before attempting an installation. A minimum of a 8 GB device is required, but the install volition appear to consummate successfully on smaller devices, just to fail at kicking. If you are mirroring the boot device, it is recommended to apply devices of the aforementioned size; otherwise, the mirror will be limited to the size of the smallest device.
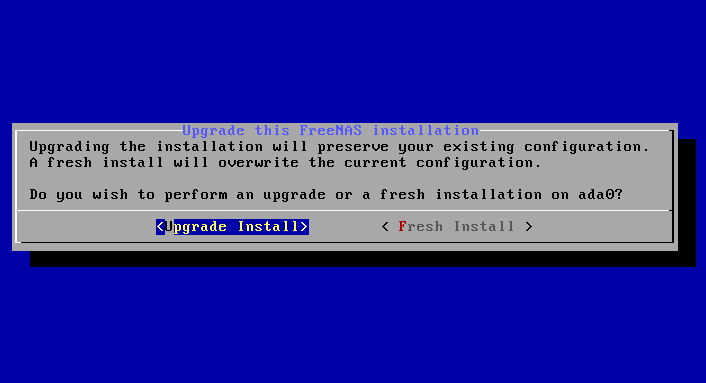
The installer volition recognize if a previous version of FreeNAS® viii.x or 9.x is already installed, and if so, will display the menu shown in Figure ii.3e. If the installer recognizes that a previous version of FreeNAS® is installed and yous wish to overwrite the existing installation, arrow over to "Fresh Install" and press Enter twice to advance to the screen shown in Effigy two.3f.
Effigy 2.3e: Performing a Fresh Install
The next screen, shown in Figure 2.3f, prompts for the root countersign which is used to log into the administrative graphical interface.
Figure two.3f: Set the Root Password
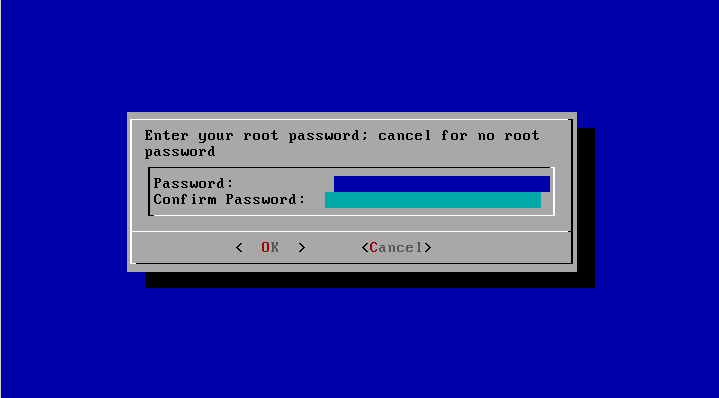
Setting a password is mandatory and the countersign tin can not be blank. Since this countersign provides access to the administrative GUI, it should be a hard-to-guess password. Input the password, press the down pointer key, and confirm the countersign. Then press Enter to start the installation.
Note
for security reasons, the SSH service and root SSH logins are disabled past default. Unless these are set, the only way to access a shell as root is to gain physical admission to the console menu or to admission the spider web shell within the administrative GUI. This ways that the FreeNAS® system should exist kept physically secure and that the authoritative GUI should be behind a properly configured firewall and protected by a secure password.
One time the installation is consummate, you should meet a message similar to Figure 2.3g.
Figure 2.3g: FreeNAS® Installation Complete
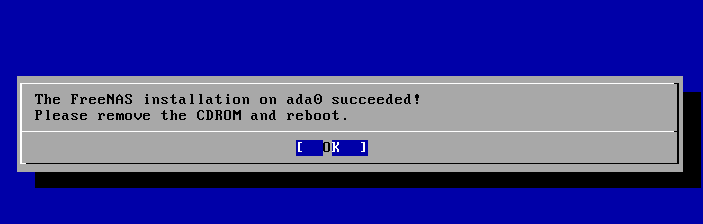
Press Enter to return to the first menu, seen in Figure 2.3a. Highlight "3 Reboot Organization" and press Enter . If booting from CD, remove the CDROM. Every bit the organisation reboots, brand certain that the device you installed to is listed equally the first boot entry in the BIOS then that the organisation will boot from it. FreeNAS® should boot into the "Console Setup" carte described in Initial Configuration Sorcerer.
2.four. Installation Troubleshooting
If the system does non boot into FreeNAS®, there are several things that you can check to resolve the situation.
First, check the organization BIOS and run across if at that place is an choice to modify the USB emulation from CD/DVD/floppy to hard drive. If it all the same will not kicking, check to see if the carte/drive is UDMA compliant.
If the organization BIOS does not support EFI with BIOS emulation, run across if it has an option to kicking using legacy BIOS fashion.
Some users have found that some brands of 4 GB USB sticks practice not work as they are not really four GB in size, merely changing to a 8 GB stick fixes the problem.
If you are writing the image to a compact flash card, make sure that it is MSDOS formatted.
If the organisation starts to boot only hangs with this repeated error message:
run_interrupt_driven_hooks: still waiting later on 60 seconds for xpt_config become into the arrangement BIOS and see if in that location is an onboard device configuration for a 1394 Controller. If so, disable the device and attempt booting again.
If the organisation starts to boot but hangs at a mountroot> prompt, follow the instructions in Workaround/Semi-Set for Mountroot Bug with ix.3.
If the burned image fails to boot and the epitome was burned using a Windows system, wipe the USB stick before trying a second burn using a utility such as Active@ KillDisk. Otherwise, the 2d fire attempt will neglect as Windows does not sympathize the partition which was written from the image file. Be very careful that you specify the USB stick when using a wipe utility!
2.5. Upgrading
Beginning with version ix.iii, FreeNAS® provides more flexibility for keeping the operating arrangement upwards-to-appointment:
- Upgrades to major releases, for example from version ix.iii to 10.0, can withal be performed using either an ISO or the graphical administrative interface. Unless the Release Notes for the new major release indicate that your current version requires an ISO upgrade, you lot tin can utilize either upgrade method.
- Pocket-size releases have been replaced with signed updates. This means that y'all do non have to await for a small release to update the system with a system update or newer versions of drivers and features and that you no longer have to manually download an upgrade file and its associated checksum in guild to do and then.
- The updater automatically creates a boot environment, meaning that updates are a depression-risk operation. Boot environments provide the choice to return to the previous version of the operating organization by rebooting the system and selecting the previous boot environment from the boot carte.
This department describes how to perform an upgrade from an earlier version of FreeNAS® to ix.3. Once 9.3 is installed, utilise the instructions in Update to go along the system updated.
2.v.1. Caveats:
Be aware of the following caveats before attempting an upgrade to nine.3:
- Upgrades from FreeNAS® 0.7x are not supported. The system has no way to import configuration settings from 0.7x versions of FreeNAS®, pregnant that you lot will accept to manually recreate your configuration, and if supported, import the FreeNAS® 0.7x volumes or disks.
- Upgrades on 32-bit hardware are non supported. However, if the organisation is currently running a 32-bit version of FreeNAS® and the hardware supports 64-bit, the system can exist upgraded but any archived reporting graphs will be lost during the upgrade.
- UFS is no longer supported. If your information currently resides on one UFS-formatted disk, you lot will demand to create a ZFS book using other disk(s) later the upgrade, then use the instructions in Import Disk to mount the UFS-formatted disk in order to copy the information to the ZFS volume. If you only accept i disk, backup its information to another organization or media earlier the upgrade, format the deejay as ZFS after the upgrade, then restore the backup. If your information currently resides on a UFS RAID of disks, you will non exist able to import that UFS book. Instead, y'all will need to fill-in that data before the upgrade, create a ZFS volume after the upgrade, and then restore the information from backup.
- The initial configuration wizard will non recognize an encrypted ZFS puddle. If your ZFS pool is GELI-encrypted and the Initial Configuration Wizard starts after the upgrade, abolish the wizard and use the instructions in Importing an Encrypted Pool to import the encrypted volume. You can then rerun the wizard subsequently, if you wish to use information technology for post-configuration, and it will recognize that the volume has been imported and volition non prompt to reformat the disks.
- DO Non upgrade the ZFS pool unless you are absolutely sure that you volition never want to get back to the previous version. For this reason, the update process volition non automatically upgrade the ZFS pool, though the Alert organisation will tell you if newer feature flags are available for the puddle. Unless you demand a new feature flag, information technology is safe to get out the ZFS pool at its current version and uncheck the alert. If yous practice determine to upgrade the pool, you lot will not be able to kicking into a previous version that does not back up the newer feature flags.
- The mps commuter for 6G Avago SAS HBAs is version xx, which requires stage 20 firmware on the controller. It is recommended to upgrade the firmware before installing FreeNAS® or immediately after upgrading FreeNAS®, using the instructions in Alert. Running older firmware can cause many woes, including the failure to probe all of the attached disks, which tin can lead to degraded or unavailable arrays. While you can mismatch your firmware version with a higher version and things will "probably still work", in that location are no guarantees every bit that commuter and firmware combination is untested.
2.5.2. Initial Training
Before upgrading the operating system, perform the following steps:
- Backup the FreeNAS® configuration in .
- If any volumes are encrypted, brand certain that yous accept ready the passphrase and have a copy of the encryption fundamental and the latest recovery key. In one case the upgrade is consummate, use the instructions in Importing an Encrypted Puddle to import the encrypted volume.
- Warn users that the FreeNAS® shares will be unavailable during the upgrade; you lot should schedule the upgrade for a fourth dimension that will to the lowest degree touch users.
- Stop all services in .
2.5.3. Upgrading Using the ISO
To perform an upgrade using this method, download the .iso to the reckoner that will be used to prepare the installation media. Burn down the downloaded .iso file to a CD or USB thumb drive using the instructions in Preparing the Media.
Insert the prepared media into the system and boot from it. In one case the media has finished booting into the installation menu, printing Enter to select the default option of "1 Install/Upgrade." The installer will present a screen showing all available drives; select the device FreeNAS® is installed into and printing Enter .
The installer will recognize that an earlier version of FreeNAS® is installed on the device and will present the message shown in Figure 2.5a.
Figure 2.5a: Upgrading a FreeNAS® Installation
Notation
if you select to perform a "Fresh Install", you lot volition have to restore the backup of your configuration using after y'all boot into the new operating organisation.
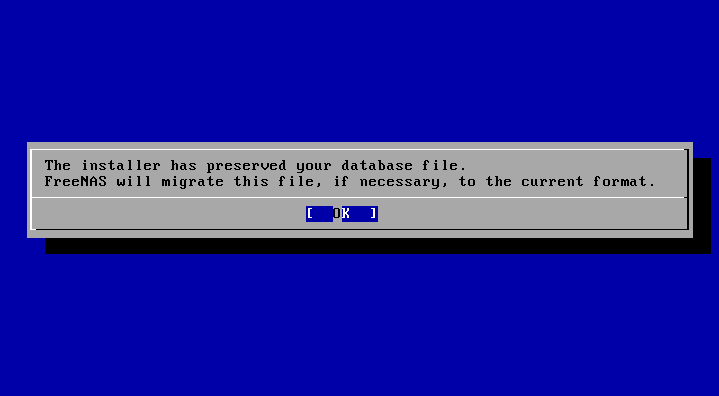
To perform an upgrade, press Enter to accept the default of "Upgrade Install". Again, the installer will remind you that the operating system should be installed on a disk that is not used for storage. Printing Enter to offset the upgrade. Once the installer has finished unpacking the new epitome, you volition see the carte shown in Effigy ii.5b. The database file that is preserved and migrated contains your FreeNAS® configuration settings.
Effigy 2.5b: FreeNAS® volition Preserve and Migrate Settings
Press Enter and FreeNAS® will bespeak that the upgrade is complete and that yous should reboot. Press "OK", highlight "3 Reboot System", and printing Enter to reboot the organization. If booting from CD, remove the CDROM.
During the reboot in that location may be a conversion of the previous configuration database to the new version of the database. This happens during the "Applying database schema changes" line in the reboot cycle. This conversion can take a long time to end and then exist patient and the kick should complete commonly. If for some reason y'all end up with database errors only the graphical authoritative interface is accessible, go to and use the "Upload Config" push to upload the configuration that yous saved before yous started the upgrade.
2.5.4. Upgrading From the GUI
To perform an upgrade using this method, download the .txz file and its associated SHA256 hash to the figurer that yous use to access the FreeNAS® organisation. Then, go to as shown in Figure ii.5c.
Figure 2.5c: Upgrading FreeNAS® From the GUI
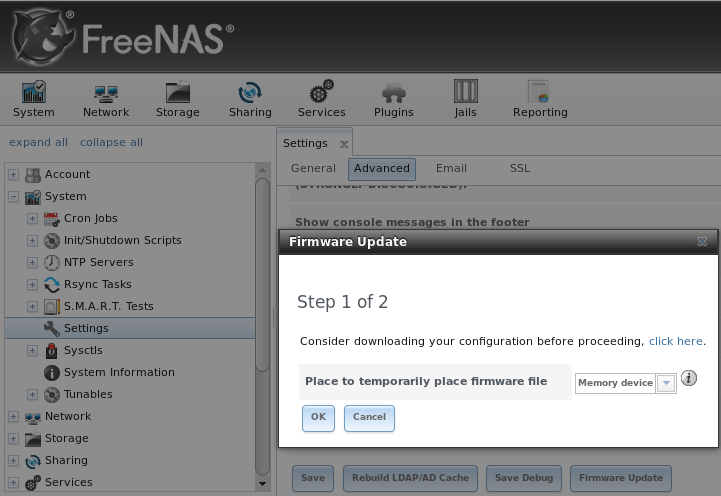
Utilise the drop-downwardly menu to select an existing book to temporarily place the firmware file during the upgrade. Alternately, select "Retention device" to allow the system to create a temporary RAM disk to be used during the upgrade. After making your selection, click the "OK" push button to see the screen shown in Effigy two.5d.
Figure 2.5d: Stride two of 2

This screen again reminds you to backup your configuration before proceeding. If you take not however, click the "click here" link.
Browse to the location of the downloaded .txz file, then paste its SHA256 sum.
When finished, click the "Utilise Update" push button to brainstorm the upgrade progress. Behind the scenes, the following steps are occurring:
- The SHA256 hash is confirmed and an mistake will display if information technology does not match. If you get this error, double-check that you pasted the right checksum and try pasting again.
- The new paradigm is uncompressed and written to the operating system drive. This can have a few minutes then be patient.
- Once the new image is written, you will temporarily lose your connexion as the FreeNAS® arrangement will reboot into the new version of the operating system. FreeNAS® will actually reboot twice: in one case the new operating system loads, the upgrade procedure applies the new database schema and reboots again.
- Assuming all went well, the FreeNAS® organisation volition receive the same IP from the DHCP server. Refresh your browser after a moment to run across if you tin access the arrangement.
ii.five.5. If Something Goes Incorrect
If an update fails, an alert will exist issued and the details volition be written to /data/update.failed .
To render to a previous version of the operating arrangement, you will need physical or IPMI admission to the FreeNAS® console. Reboot the system and picket for the boot bill of fare. In the example shown in Effigy 2.5e, the commencement boot menu entry, FreeNAS (default), refers to the initial installation, before the update was applied. The second boot entry, FreeNAS-1415259326, refers to the electric current version of the operating system, later the update was applied. This second entry is highlighted and begins with a star, indicating that this is the environment the system will boot into, unless another entry is manually selected. Both entries include a appointment and timestamp, indicating when that boot surroundings was created.
Figure two.5e: Boot Card
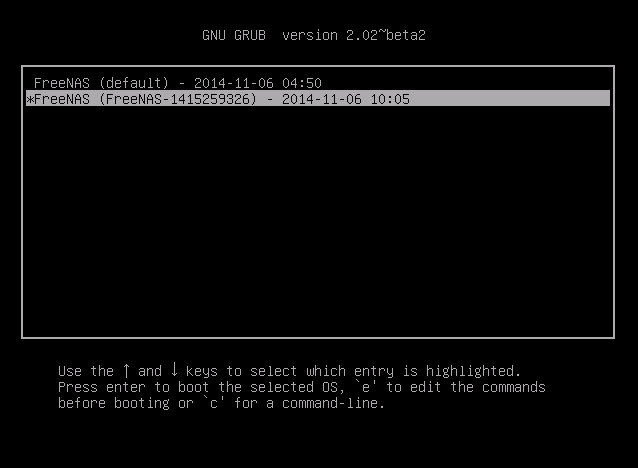
To kicking into the previous version of the operating organisation, use the upward or down pointer to select it and press enter.
Should a boot device fail and the arrangement no longer boots, don't panic. The data is still on your disks and you still take a re-create of your saved configuration. Yous tin always:
- Perform a fresh installation on a new kick device.
- Import your volumes in .
- Restore the configuration in .
Note
y'all cannot restore a saved configuration which is newer than the installed version. For example, if you reboot into an older version of the operating organisation, you cannot restore a configuration that was created in a later on version.
two.5.6. Upgrading a ZFS Pool
Starting time with FreeNAS® 9.3, ZFS pools can exist upgraded from the graphical authoritative interface.
Before upgrading an existing ZFS pool, be aware of the following caveats first:
- the pool upgrade is a one-way street meaning that if you change your mind you can not go dorsum to an before ZFS version or downgrade to an earlier version of FreeNAS® that does not support those feature flags.
- before performing whatever operation that may affect the data on a storage disk, always backup your data first and verify the integrity of the backup. While it is unlikely that the puddle upgrade will bear on the data, it is always improve to be safety than sorry.
- upgrading a ZFS pool is optional. You practice not need to upgrade the puddle if you practise not need newer feature flags or if you want to continue the possibility of reverting to an before version of FreeNAS® or repurposing the disks in another operating system that supports ZFS. If you do decide to upgrade the puddle to the latest feature flags, you volition not exist able to import that puddle into another operating organization that does not nonetheless back up those feature flags.
To perform the ZFS pool upgrade, go to and highlight the book (ZFS puddle) to upgrade. Click the "Upgrade" button as seen in Figure 2.5f.
Note
if the "Upgrade" push button does not announced, the pool is already at the latest feature flags and does non need to be upgraded.
Figure 2.5f: Upgrading a ZFS Pool
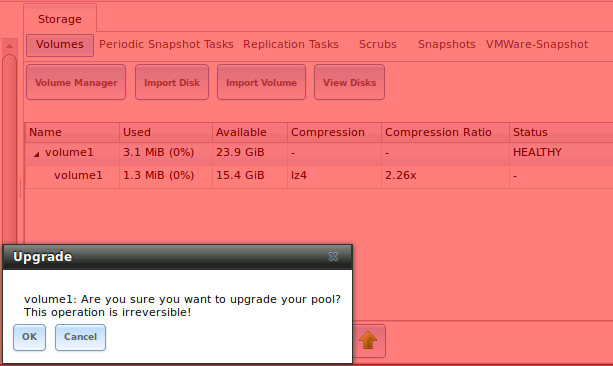
The warning bulletin will remind you that a pool upgrade is irreversible. Click "OK" to go along with the upgrade.
The upgrade itself should only take a seconds and is not-confusing. This means that you do not need to stop any sharing services in lodge to upgrade the pool. All the same, y'all should choose to upgrade when the pool is not existence heavily used. The upgrade process volition suspend I/O for a short period, merely should be nearly instantaneous on a tranquillity puddle.
two.6. Virtualization
FreeNAS® can be run inside a virtual environment for development, experimentation, and educational purposes. Delight annotation that running FreeNAS® in production as a virtual machine is not recommended. If you decide to use FreeNAS® within a virtual surround, read this post first as it contains useful guidelines for minimizing the risk of losing your data.
In club to install or run FreeNAS® within a virtual environs, you will need to create a virtual machine that meets the following minimum requirements:
- at least 8192 MB base of operations retentivity size
- a virtual disk at least 8 GB in size to hold the operating organization and kicking environments
- at to the lowest degree one more than virtual disk at least 4 GB in size to be used as information storage
- a bridged adapter
This section demonstrates how to create and access a virtual machine inside the VirtualBox and VMware ESXi environments.
2.six.1. VirtualBox
VirtualBox is an open source virtualization programme originally created past Dominicus Microsystems. VirtualBox runs on Windows, BSD, Linux, Macintosh, and OpenSolaris. It can be configured to use a downloaded FreeNAS® .iso file, and makes a good testing environment for practicing configurations or learning how to use the features provided by FreeNAS®.
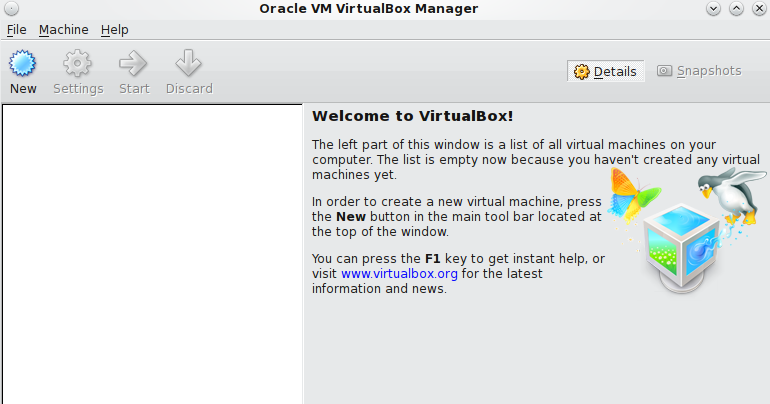
To create the virtual motorcar, starting time VirtualBox and click the "New" button, seen in Figure 2.6a, to start the new virtual automobile wizard.
Figure 2.6a: Initial VirtualBox Screen
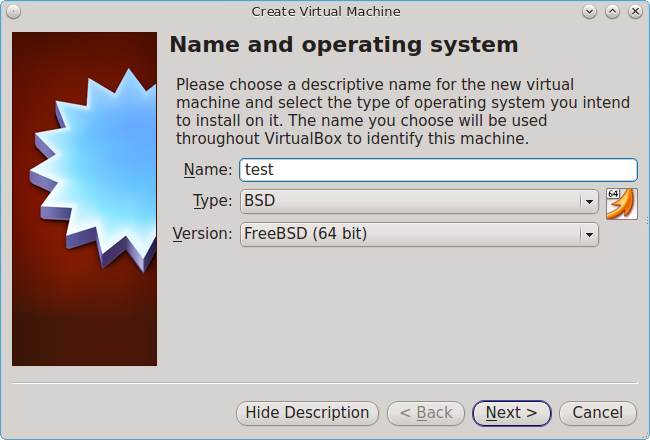
Click the "Next" button to see the screen in Figure two.6b. Enter a name for the virtual motorcar, click the "Operating Organisation" drop-downward menu and select BSD, and select "FreeBSD (64-bit)" from the "Version" dropdown.
Figure two.6b: Type in a Name and Select the Operating Organization for the New Virtual Machine
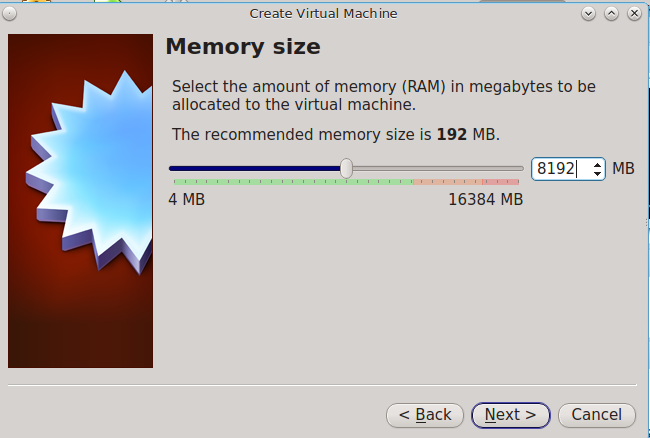
Click "Next" to see the screen in Figure 2.6c. The base memory size must be changed to at least 8192 MB. When finished, click "Next" to encounter the screen in Figure 2.6d.
Effigy 2.6c: Select the Amount of Retention Reserved for the Virtual Machine
Effigy 2.6d: Select Whether to Utilize an Existing or Create a New Virtual Difficult Drive
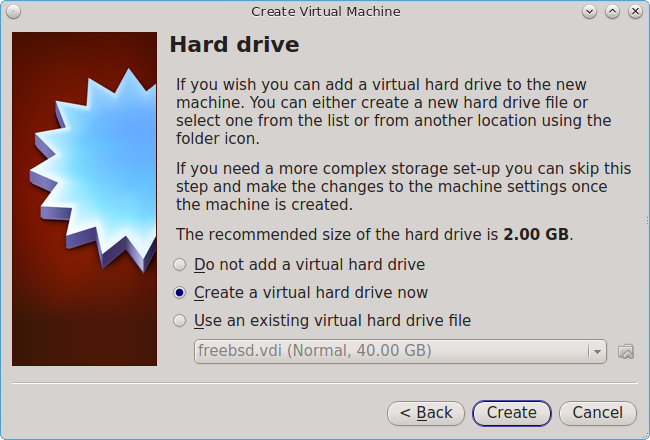
Click "Create" to launch the "Create Virtual Difficult Drive Wizard" shown in Figure ii.6e.
Figure ii.6e: Create New Virtual Difficult Drive Wizard
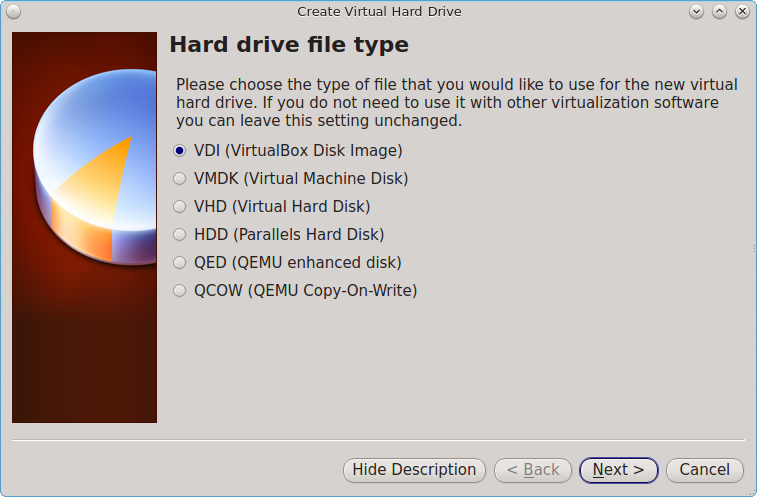
Select "VDI" and click the "Adjacent" button to see the screen in Figure two.6f.
Figure 2.6f: Select the Storage Type for the Virtual Disk
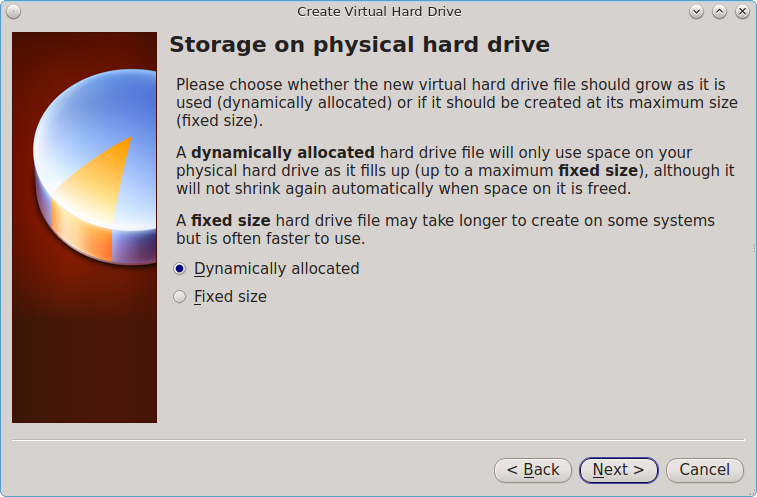
You tin can at present choose whether you want "Dynamically allocated" or "Fixed-size" storage. The beginning choice uses deejay space equally needed until it reaches the maximum size that you will set up in the next screen. The second option creates a disk the same size as that specified corporeality of deejay space, whether information technology is used or not. Cull the first selection if y'all are worried almost disk infinite; otherwise, choose the second option as it allows VirtualBox to run slightly faster. One time you select "Next", you will see the screen in Figure 2.6g.
Figure 2.6g: Select the File Name and Size of the Virtual Disk
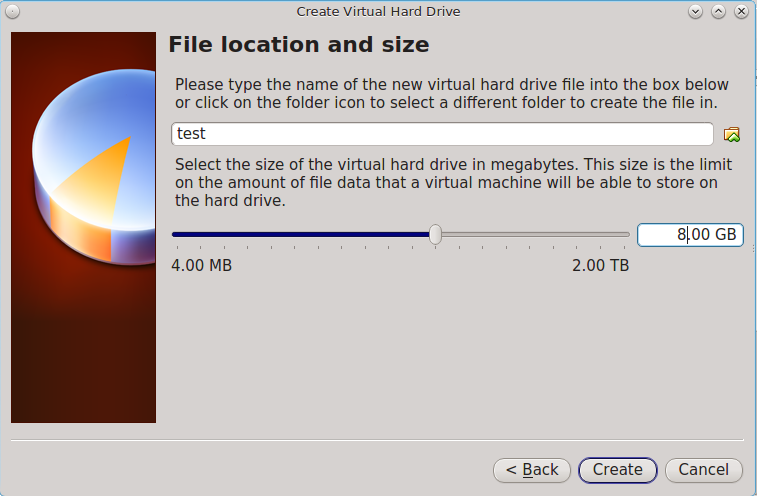
This screen is used to set the size (or upper limit) of the virtual machine. Increase the default size to 8 GB. Use the binder icon to browse to a directory on deejay with sufficient space to concur the virtual machine.
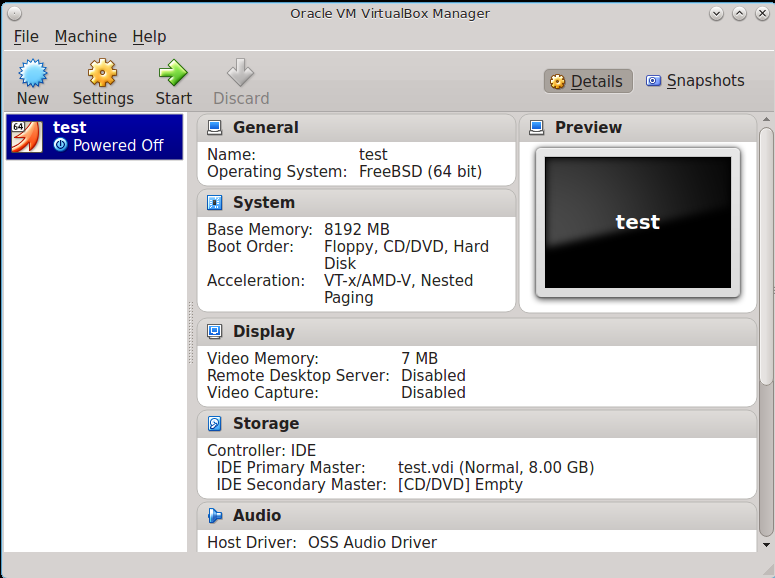
Once yous make your pick and press "Side by side", you will come across a summary of your choices. Apply the "Dorsum" button to return to a previous screen if yous need to alter whatsoever values. Otherwise, click "Finish" to finish using the magician. The virtual motorcar will be listed in the left frame, as seen in the example in Figure 2.6h.
Figure 2.6h: The New Virtual Machine
Side by side, create the virtual disk(s) to be used for storage. Click the "Storage" hyperlink in the right frame to admission the storage screen seen in Effigy 2.6i.
Figure 2.6i: The Storage Settings of the Virtual Machine
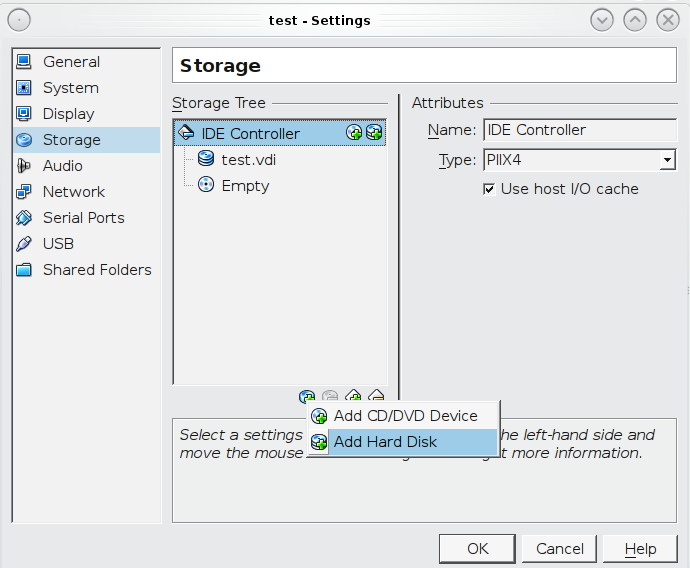
Click the "Add Attachment" push button, select "Add together Hard Deejay" from the popular-upwards carte, so click the "Create New Deejay" button. This volition launch the Create New Virtual Difficult Drive Wizard (seen in Figures 2.2e and 2.2f). Since this deejay will be used for storage, create a size appropriate to your needs, making sure that information technology is at least iv GB in size. If you lot wish to practice RAID configurations, create as many virtual disks as you need. You volition be able to create 2 disks on the IDE controller. If you need boosted disks, click the "Add together Controller" button to create another controller to attach disks to.
Adjacent, create the device for the installation media. Highlight the word "Empty", then click the "CD" icon equally seen in Figure two.6j.
Figure two.6j: Configuring the ISO Installation Media
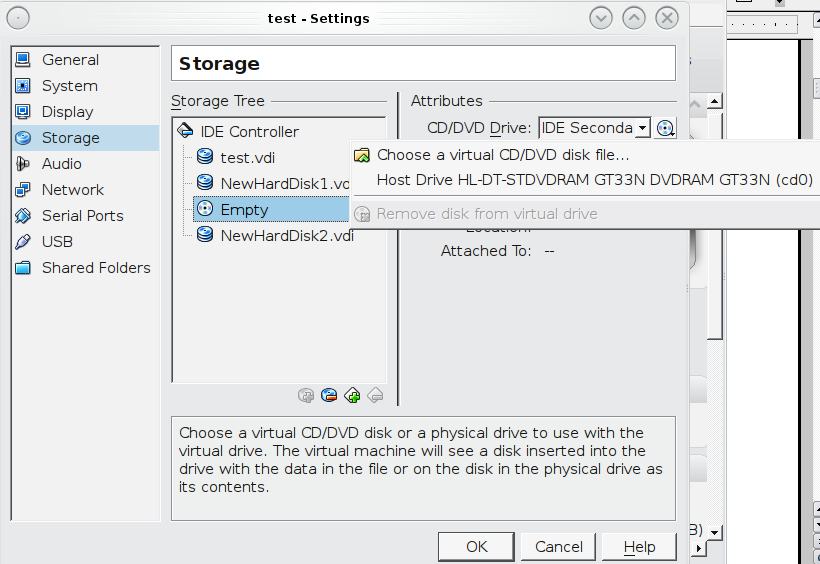
Click "Choose a virtual CD/DVD disk file..." to browse to the location of the .iso file. Alternately, if you have burned the .iso to deejay, select the detected "Host Drive".
Depending upon the extensions available in your CPU, you may or may not be able to utilize the ISO. If you lot receive the mistake "your CPU does not support long way" when you try to boot the ISO, your CPU either does not have the required extension or AMD-5/VT-x is disabled in the organization BIOS.
Note
if you receive a kernel panic when booting into the ISO, stop the virtual machine. Then, get to Organisation and check the box "Enable IO APIC".
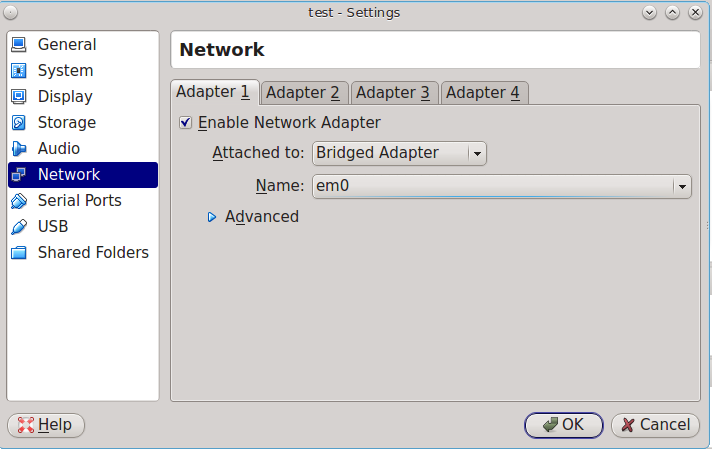
To configure the network adapter, go to . In the "Fastened to" drib-down menu select "Bridged Adapter", and so select the name of the physical interface from the "Name" drop-down menu. In the instance shown in Effigy 2.6k, the Intel Pro/one thousand Ethernet card is fastened to the network and has a device name of em0.
Figure two.6k: Configuring a Bridged Adapter in VirtualBox
Once your configuration is complete, click the "Start" arrow and install FreeNAS® as described in Performing the Installation. Once FreeNAS® is installed, press "F12" to access the boot card in order to select the primary hard disk as the kick selection. You lot can permanently kick from disk by removing the "CD/DVD" device in "Storage" or by unchecking "CD/DVD-ROM" in the "Boot Lodge" section of "System".
ii.half dozen.2. VMware ESXi
If you are considering using ESXi, read this post for an explanation of why iSCSI volition be faster than NFS.
ESXi is is a bare-metal hypervisor architecture created by VMware Inc. Commercial and free versions of the VMware vSphere Hypervisor operating system (ESXi) are bachelor from the VMware website. Once the operating arrangement is installed on supported hardware, use a spider web browser to connect to its IP address. The welcome screen will provide a link to download the VMware vSphere client which is used to create and manage virtual machines.
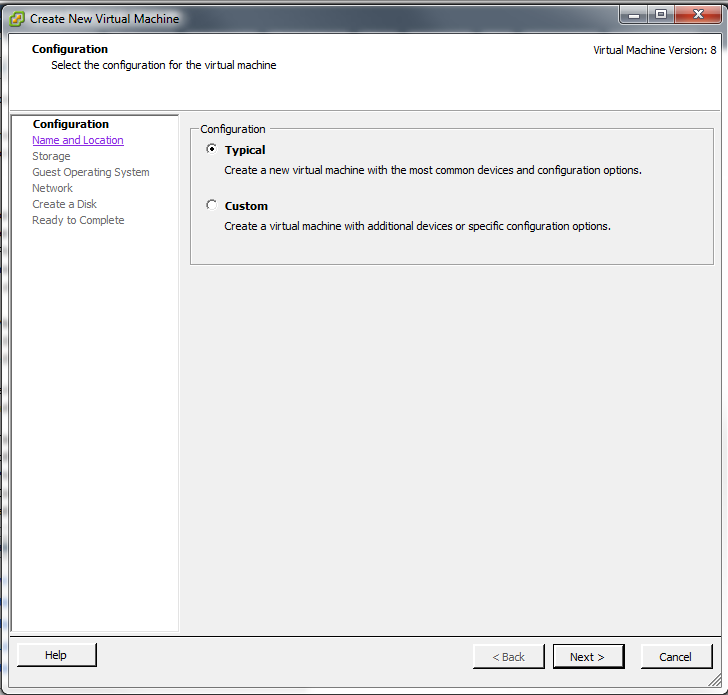
Once the VMware vSphere client is installed, use information technology to connect to the ESXi server. To create a new virtual auto, click . The New Virtual Machine Sorcerer will launch as seen in Figure 2.6l.
Figure 2.6l: New Virtual Machine Wizard
Click "Side by side" and input a proper name for the virtual machine. Click "Next" and highlight a datastore. An example is shown in Effigy 2.6m. Click "Side by side". In the screen shown in Figure ii.6n, click "Other" then select a FreeBSD architecture that matches the FreeNAS® architecture.
Effigy 2.6m: Select a Datastore
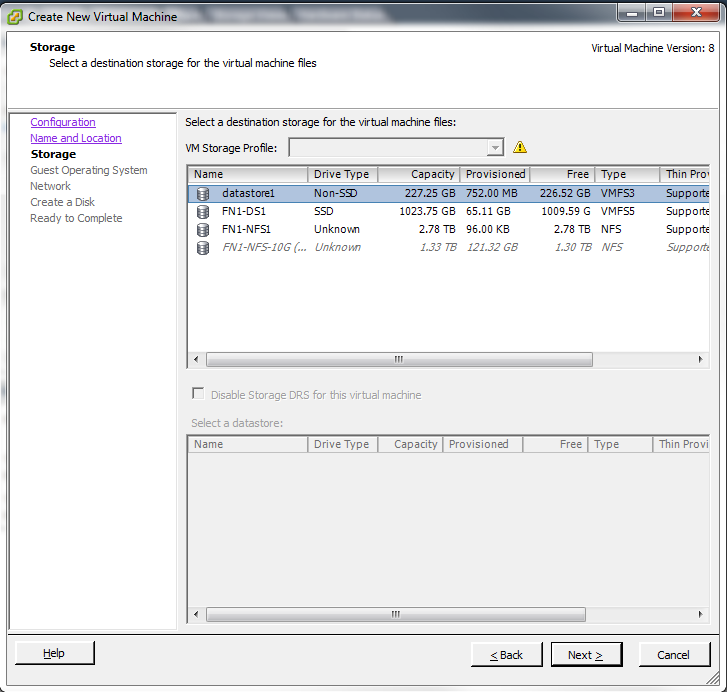
Figure 2.6n: Select the Operating System

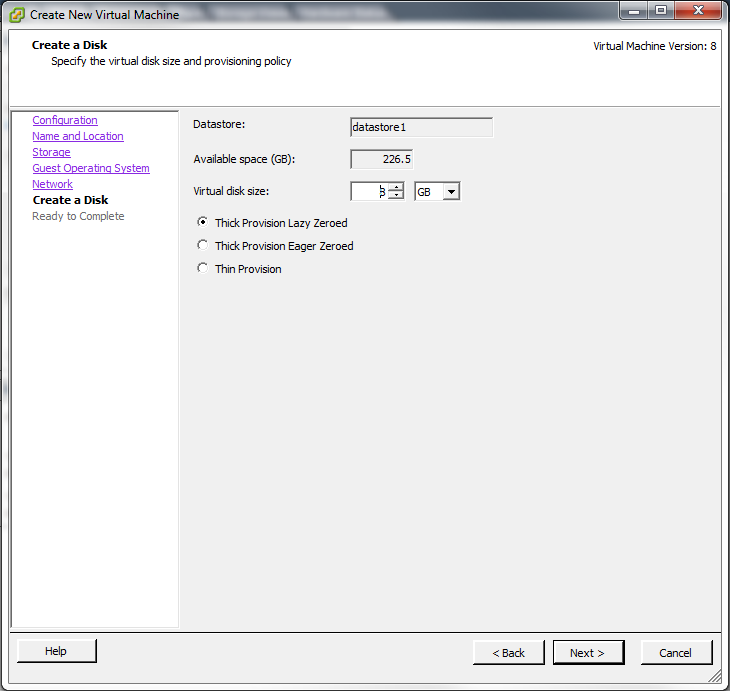
Click "Side by side" and create a virtual disk file of eight GB to concord the FreeNAS® operating system, every bit shown in Figure two.6o.
Effigy 2.6o: Create a Disk for the Operating Organization
Click "Next" and so "Terminate". Your virtual motorcar volition exist listed in the left frame. Correct-click the virtual machine and select "Edit Settings" to access the screen shown in Figure ii.6p.
Figure 2.6p: Virtual Machine's Settings
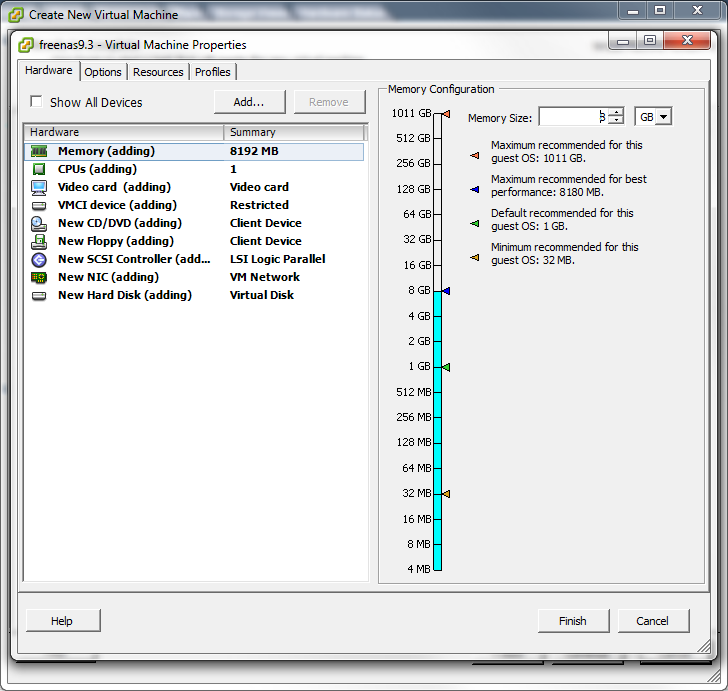
Increase the "Memory Configuration" to at least 8192 MB.
Under "CPUs", make sure that only i virtual processor is listed, otherwise you lot will be unable to start whatever FreeNAS® services.
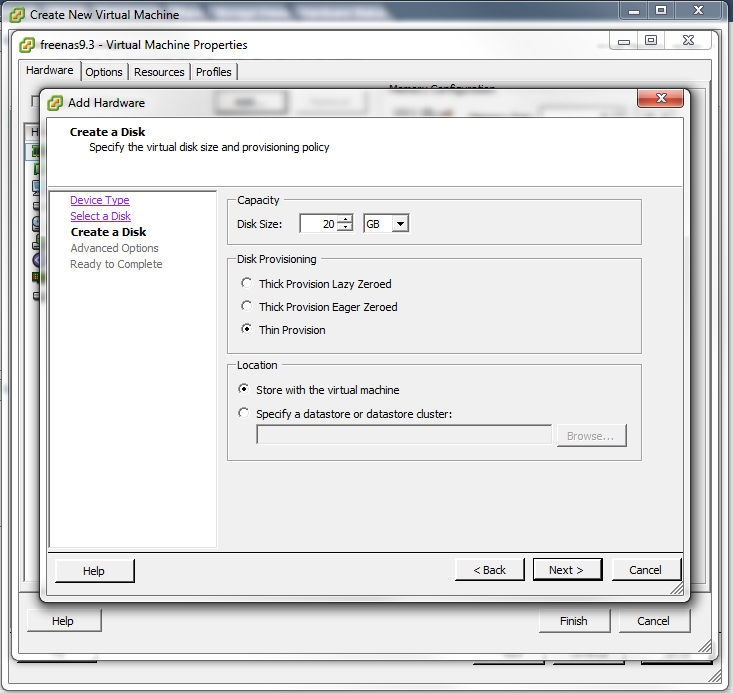
To create a storage disk, click . In the "Device Blazon" card, highlight "Hd" and click "Next". Select "Create a new virtual disk" and click "Next". In the screen shown in Figure two.6q, select the size of the deejay. If you would like the size to be dynamically allocated every bit needed, check the box "Allocate and commit infinite on demand (Thin Provisioning)". Click "Side by side", then "Adjacent", and then "Finish" to create the disk. Repeat to create the amount of storage disks needed to meet your requirements.
Figure ii.6q: Creating a Storage Disk
If you lot are running ESX 5.0, Workstation viii.0, or Fusion iv.0 or college, boosted configuration is needed so that the virtual HPET setting does not forestall the virtual machine from booting.
If you are running ESX, while in "Edit Settings", click . Modify "hpet0.nowadays" from true to faux, then click "OK" twice to save the setting.
If you are running Workstation or Player, while in "Edit Settings", click . Locate the path for the Configuration file named filename.vmx . Open that file in a text editor, change "hpet0.present" from true to false, and relieve the change.
Source: https://www.ixsystems.com/documentation/freenas/9.3/freenas_install.html
0 Response to "Freenas Firmware Update Stuck at 1/3 Uploading Firmware"
Postar um comentário